Installing the Addrevenue tag in Google Tag Manager
We recommend using our simple tag from Google Tag Manager's Community Template Gallery to install tracking. This makes installation easier since you don't need to write any code yourself – you just select the tag type and map your variables.
Importing the Addrevenue tag
1. Go into your container in Google Tag Manager and click Tags → New.
2. Click the tag configuration (the pencil/icon at the top) to choose a tag type.
3. Click Discover more tag types in the Community Template Gallery (bottom right).
4. Search for Addrevenue and select our tag "Addrevenue - Tracking tag".
5. Click Add to workspace and then Add to accept the permissions.
Creating the base tag
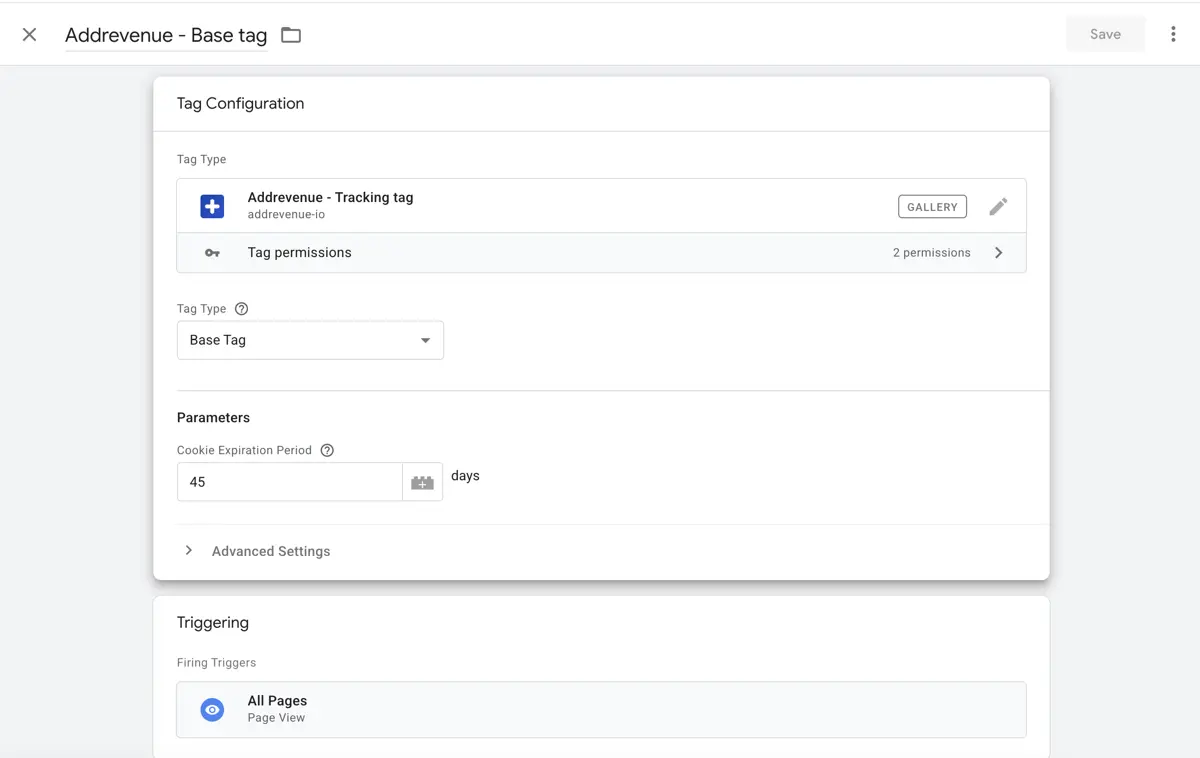
The base tag loads our tracking script on all pages, but doesn't send a conversion.
1. Name the tag "Addrevenue - Base tag".
2. Select the tag type "Addrevenue - Tracking tag" that you just imported.
3. Leave the fields Value, Currency code and Order ID empty – the tag only sends a conversion if an Order ID is set, so without it only the tracking script is loaded.
4. In the Consent Type field, select the consent type your consent platform (CMP) uses for marketing/advertising cookies – usually ad_storage, which is the default. See Consent configuration below.
5. Add the trigger "All Pages - Page View". Also add a trigger that fires when the visitor updates their consent, so the tag fires again with the new consent state (see Consent configuration below).
6. Click Save.
Known bug in GTM: if you click to create a new tag right after saving the base tag, the newly imported Addrevenue template won't show up in the list of tag types – and if you try to import it again, GTM will say it's already imported. The fix is to refresh the page in your browser before creating the next tag (the conversion tag below). After a refresh, Addrevenue will appear in the list of tag types as normal.
Creating the conversion tag
After refreshing the page as described above:
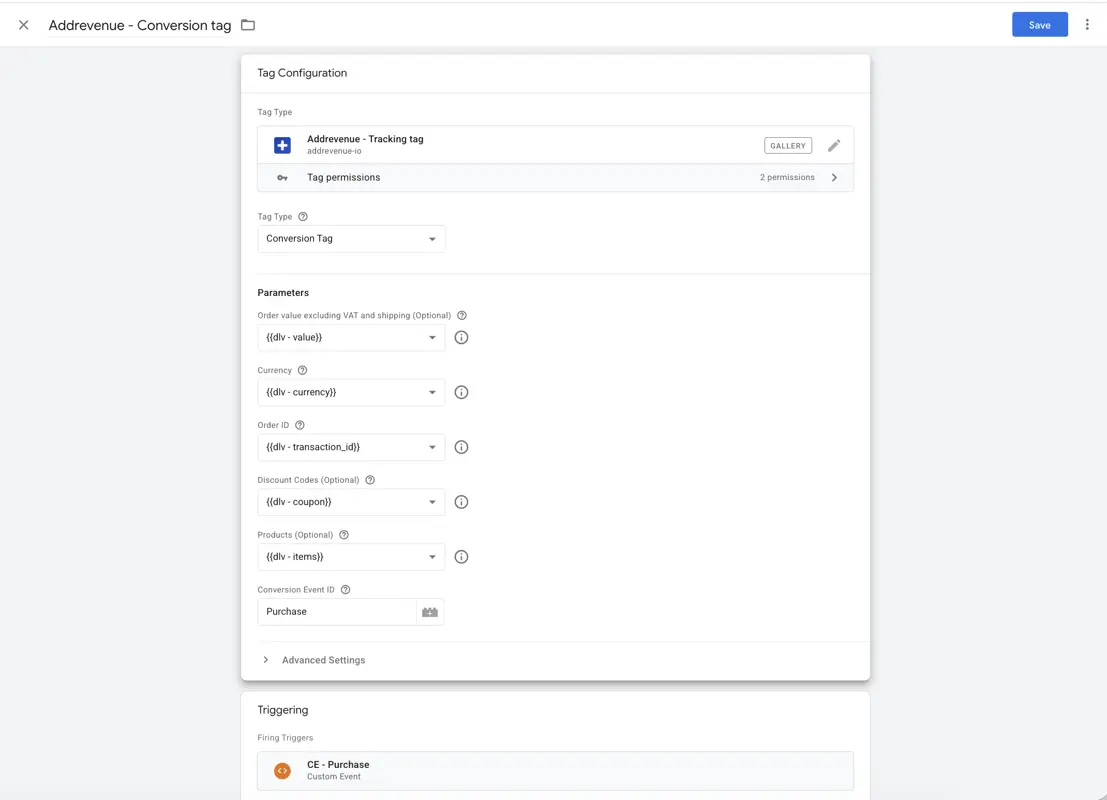
1. Create a new tag and name it "Addrevenue - Conversion tag".
2. Select the tag type "Addrevenue - Tracking tag".
3. Fill in the fields according to the table below, using variables from your data layer (dataLayer) that are normally set on the thank-you/receipt page.
4. Add a trigger for your purchase event, e.g. a page view of the thank-you/receipt page or a specific event.
Set Consent Type to the same value as in the base tag. Don't add the consent update trigger to the conversion tag – it would send the purchase again when the visitor gives consent.
5. Click Save.
Parameter mapping
You'll usually find these values as variables in your data layer (e.g. via a Data Layer Variable in GTM) on the thank-you/receipt page. If these variables haven't already been set up, they'll need to be created first. You may need to involve a developer, or contact our technicians at Addrevenue for help.
| Value | Variable. Decimal number of the order value, excluding VAT and shipping. |
| Currency code | Variable. Currency code according to ISO 4217 (three letters), e.g. SEK. |
| Order ID | Variable. String with the order number/transaction ID. Required for a conversion to be sent. |
| Discount codes | Variable (optional). String with any discount code(s), separated by commas if more than one. |
| Products | Variable (optional). Array of product objects, each containing id, name, quantity, price and category. |
| Conversion Event ID | Text field. Must match the Conversion Event ID set up in your commission program. Default value: "Purchase". |
| Consent Type | Dropdown. The Google Consent Mode type the tag reads to determine whether the visitor has given consent: ad_storage (default), analytics_storage, ad_user_data or ad_personalization. Select the one your CMP sets for marketing cookies, and use the same value in both tags. |
Consent configuration
The Addrevenue tag reads the visitor's consent state from Google Consent Mode and passes it on to our tracking script. If consent has been denied, the script runs in a cookieless mode: no cookies are set, and tracking relies only on parameters in the URL. Once consent is granted, full tracking is used. This means the tags should not be blocked in GTM while waiting for consent – the consent handling takes place inside the tag. The advertiser is still responsible for handling consent correctly.
1. Don't block the tags in GTM
Open each Addrevenue tag → Advanced Settings → Consent Settings and make sure Require additional consent for tag to fire is not enabled. If it is, the tag doesn't fire at all before consent, and not even cookieless tracking can run.
2. Select the right Consent Type
In the Consent Type field, select the consent type your CMP sets for marketing/advertising cookies, and use the same value in both tags. The default, ad_storage, is correct for most CMPs that support Google Consent Mode v2 – but check your CMP's settings rather than assuming.
3. Set a default consent state
Your container needs a tag that sets a default consent state of denied for the selected consent type – usually your CMP's own GTM tag on the trigger "Consent Initialization - All Pages", so that it fires before the Addrevenue tags. Important: if no default is set for the selected consent type, the tag treats consent as granted, even before the visitor has made a choice.
4. Fire the base tag again when consent is updated
Most CMPs push an event to the data layer when the visitor updates their consent (for example cookie_consent_update for Cookiebot or OneTrustGroupsUpdated for OneTrust). Create a Custom Event trigger for that event and add it to the base tag alongside "All Pages - Page View". This activates full tracking as soon as the visitor accepts, without waiting for the next page view. Don't add this trigger to the conversion tag.
If your CMP doesn't support Google Consent Mode:
The tag can't read the consent state and treats all visitors as having given consent. In that case, use a trigger that only fires when consent for marketing/tracking has been given, and apply it to both tags instead of "All Pages – Page View". See your CMP provider's GTM integration guide for the exact configuration.
If you don't use a consent platform:
Without Consent Mode, the tag treats all visitors as having given consent, and full tracking with cookies is used. You must implement a CMP before using client-side tracking. Addrevenue recommends a CMP that supports Google Consent Mode v2.
Testing the tracking
Once the tags are in place, use GTM's Preview mode to verify that the base tag loads the script on all pages and that the conversion tag sends an event with the correct values on the thank-you/receipt page. Then publish your changes in GTM.
To verify the consent handling, open Preview mode in a new browser session without accepting cookies: the base tag should fire and load track.js with consent=denied. After accepting cookies, the base tag should fire again and load it with consent=granted. You can see this in the Network tab of your browser's developer tools.
Once you've installed the tracking code, we'd like you to make a test purchase. See our Test purchase guide for step-by-step instructions and troubleshooting help.
If you'd like help installing this in your existing Google Tag Manager container, you can invite tech-support@addrevenue.io with full read and write access, and we'll help you out!
Create account
By submitting I accept addrevenue.io's terms of use and privacy policy.
This site is protected by reCAPTCHA and the Google Privacy Policy and Terms of Service apply.
By submitting I accept addrevenue.io's terms of use and privacy policy.
This site is protected by reCAPTCHA and the Google Privacy Policy and Terms of Service apply.
By submitting I accept addrevenue.io's terms of use and privacy policy.
This site is protected by reCAPTCHA and the Google Privacy Policy and Terms of Service apply.
Choose the account type that best suits your profile