Setup of tracking code for Wix
You who use Wix can follow the guide below to easily install our tracking code in your webshop:
The base script for Wix
1. In your Wix control panel, under Settings > Custom Code, click "Add Custom Code".
2. Under "Paste code snippet here:" paste the following code snippet:
<script async src='https://addrevenue.io/track.js'></script>
3. Give the code a name, e.g. "Addrevenue - Base tag". When you're done, it should look like this:
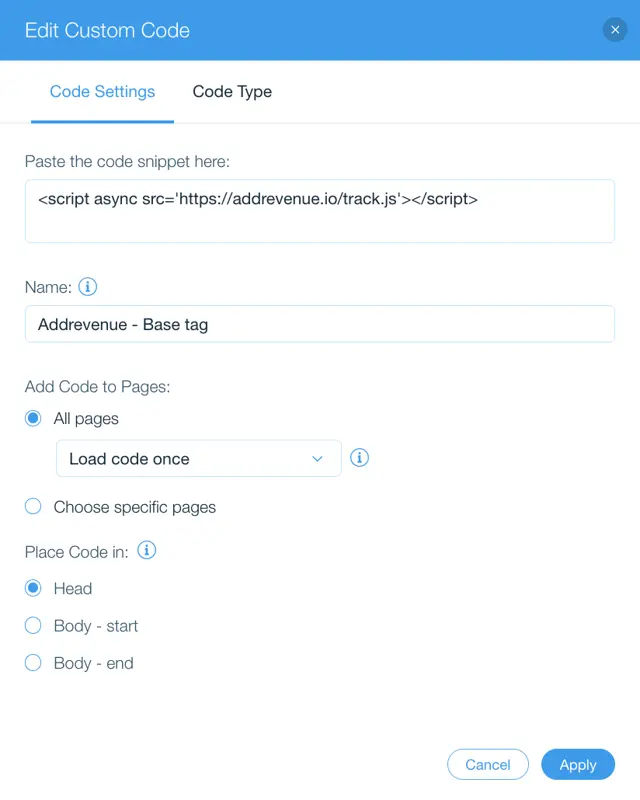
4. Click Apply.
The conversion script for Wix
1. In your Wix control panel, under Settings > Custom Code, click "Add Custom Code".
2. Under "Paste code snippet here:" paste the following code snippet:
<script src='https://addrevenue.io/track.js'></script>

<script>

function registerListener() {

    window.wixDevelopersAnalytics.register('conversionListener', (e, p) => {

        if (e === 'Purchase') {

            ADDREVENUE.sendEvent('Purchase', {

                  'value': (p.revenue - p.shipping - p.tax).toFixed(2),

                  'currency': p.currency,

                  'orderId': (p.id ? p.id : p.orderId),

                  'items': p.contents,

                  'discountCodes': p.coupon

               });

        }

    });

}

window.wixDevelopersAnalytics ? registerListener() :

window.addEventListener('wixDevelopersAnalyticsReady', registerListener);

</script>
3. Give the code a name, e.g. "Addrevenue - Conversion tag".
4. Under Add Code to Pages, go to Specific Pages and locate the Thank You page.
5. Under Place code in, select "Body - end". When you're done, it should look like this:
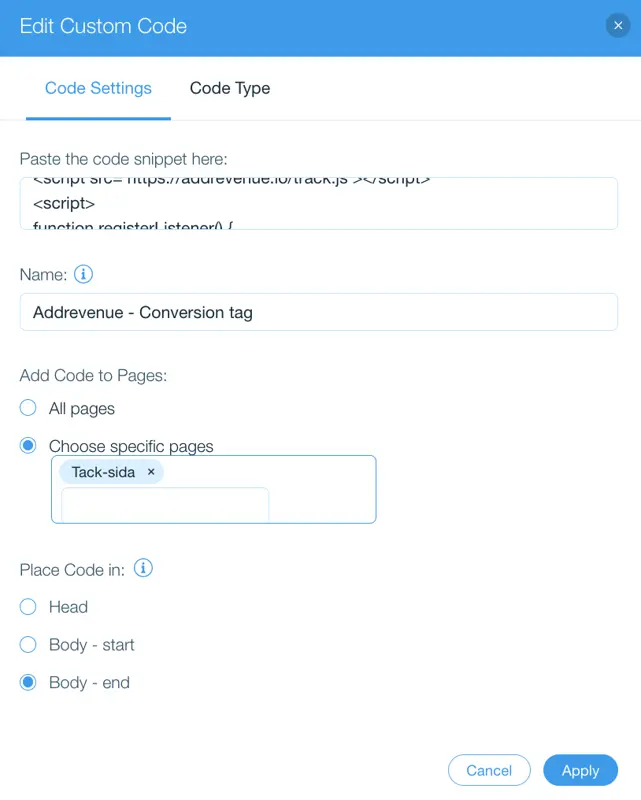
6. Click Apply.
Your tracking code is now installed. Once you have installed the tracking code, we would like you to complete a test purchase. See our Test Purchase Guide for step-by-step and troubleshooting help.
Create account
By submitting I accept addrevenue.io's terms of use and privacy policy.
This site is protected by reCAPTCHA and the Google Privacy Policy and Terms of Service apply.
By submitting I accept addrevenue.io's terms of use and privacy policy.
This site is protected by reCAPTCHA and the Google Privacy Policy and Terms of Service apply.
By submitting I accept addrevenue.io's terms of use and privacy policy.
This site is protected by reCAPTCHA and the Google Privacy Policy and Terms of Service apply.
Choose the account type that best suits your profile